Thinking about upgrading your home’s exterior? James Hardie siding offers a durable and aesthetically pleasing solution. This comprehensive guide dives deep into every aspect of James Hardie siding installation, from understanding the different types of siding available and preparing your surface, to mastering installation techniques and handling potential issues. We’ll cover essential tools, materials, cost considerations, and long-term maintenance, ensuring you’re fully equipped for a successful project. Get ready to transform your home’s curb appeal with this detailed walkthrough.
We’ll explore the nuances of this popular siding choice, demystifying the process from start to finish. Whether you’re a seasoned DIYer or hiring a contractor, understanding the intricacies of James Hardie installation is key to achieving a stunning and long-lasting result. This guide provides the knowledge you need to make informed decisions, saving you time, money, and potential headaches down the line.
Understanding James Hardie Siding
James Hardie siding, a popular choice for homeowners, offers a durable and aesthetically pleasing exterior cladding solution. Understanding its various types, advantages, disadvantages, and warranty is crucial for making an informed decision about your home’s exterior. This comprehensive overview will equip you with the knowledge necessary to confidently choose the right siding for your needs.
James Hardie Siding Types
James Hardie offers a range of siding products designed to meet diverse architectural styles and homeowner preferences. These products vary in texture, appearance, and installation methods. Choosing the right type depends on factors like your budget, desired aesthetic, and the climate in your region.
- HardiePlank® Lap Siding: This classic lap siding mimics the look of traditional wood siding but with superior durability and weather resistance. It’s available in a variety of colors and textures, providing versatility for different home styles.
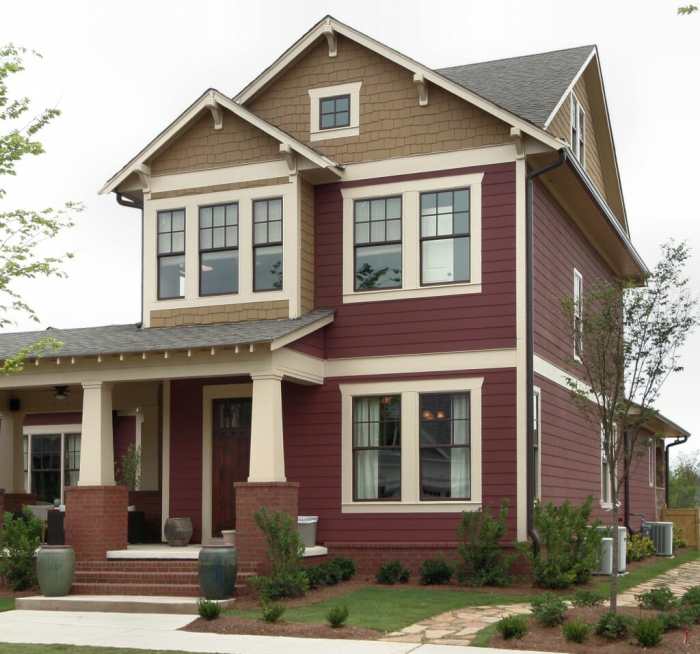
- HardieShingle® Siding: Designed to replicate the look of cedar shingles, HardieShingle offers a charming and rustic appearance. It’s ideal for homes with a traditional or craftsman style.
- HardiePanel® Vertical Siding: This contemporary siding option provides a clean, modern look with vertical panels. It’s often chosen for its sleek lines and ease of installation.
- HardieTrim & Batten: This option allows for a more customized and detailed look, offering a range of trim and batten styles to complement the main siding. It’s often used to accentuate architectural details.
Advantages of James Hardie Siding
James Hardie siding boasts numerous advantages over other materials, making it a compelling choice for many homeowners. These advantages contribute to its longevity, low maintenance, and overall value.
- Durability and Longevity: Engineered from fiber cement, James Hardie siding is incredibly resistant to damage from impact, moisture, insects, and rot. This results in a significantly longer lifespan compared to wood siding.
- Low Maintenance: Unlike wood siding, James Hardie requires minimal upkeep. It doesn’t need regular painting or staining, reducing both time and cost commitments.
- Fire Resistance: James Hardie siding is non-combustible, providing an added layer of fire protection for your home. This is a significant safety advantage over wood or vinyl siding.
- Pest Resistance: Resistant to termites and other wood-boring insects, James Hardie siding eliminates the risk of costly pest infestations and repairs.
- Aesthetic Versatility: Available in a wide range of colors, textures, and styles, James Hardie siding can complement any architectural style.
Disadvantages of James Hardie Siding
While offering numerous benefits, James Hardie siding also has some drawbacks to consider. Understanding these potential downsides allows for a more balanced assessment.
- Higher Initial Cost: James Hardie siding typically has a higher upfront cost compared to vinyl or aluminum siding.
- Installation Complexity: The installation process can be more complex than that of some other siding materials, potentially leading to higher labor costs.
- Weight: Fiber cement is heavier than other siding materials, requiring a stronger structure to support it.
- Susceptibility to Cracking (under specific conditions): While durable, James Hardie siding can be susceptible to cracking if not properly installed or maintained in extremely harsh climates. Proper installation is crucial to mitigate this risk.
James Hardie Siding Warranty and Lifespan
James Hardie provides a comprehensive warranty on its products, covering defects in materials and workmanship. The specific terms and conditions vary depending on the product and region, but generally offer a long-term assurance. The lifespan of James Hardie siding is significantly longer than wood or vinyl, often exceeding 30 years with proper maintenance. This longevity contributes to its long-term value and cost-effectiveness. For specific warranty details, always consult the manufacturer’s website or your installer.
Installation Process Overview
Installing James Hardie siding is a multifaceted process requiring precision and attention to detail. Proper installation ensures the longevity and performance of your siding, protecting your home from the elements and enhancing its curb appeal. This section provides a comprehensive overview of the key steps involved.
Step-by-Step James Hardie Siding Installation Guide
The installation process begins with thorough preparation and continues through several crucial steps. Each stage requires specific tools and techniques to ensure a seamless, professional finish.
- Preparation: This critical first step involves measuring the area, ordering the correct amount of siding, and preparing the underlying structure. This includes ensuring the sheathing is properly installed and any necessary repairs are completed. Proper preparation prevents future issues and ensures a smooth installation process.
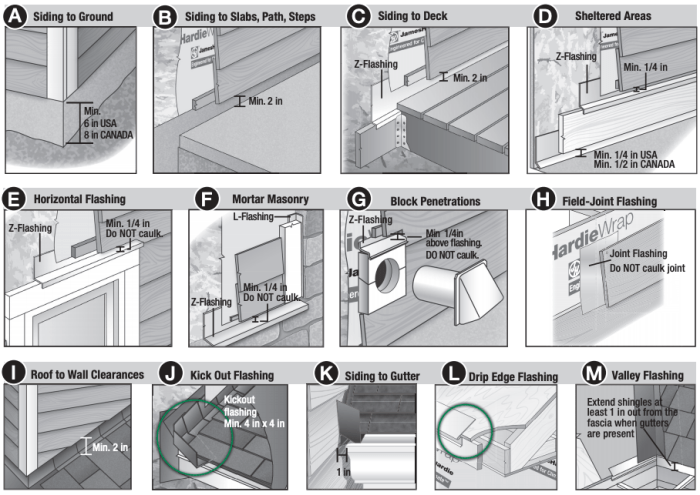
- Framing and Flashing: This stage involves installing the necessary framing around windows, doors, and other features. Proper flashing is crucial to prevent water penetration. This step needs meticulous attention to detail, as any gaps can lead to leaks and damage.
- Sheathing Installation: The sheathing acts as a substrate for the siding. This typically involves installing moisture-resistant sheathing boards, ensuring they are properly fastened and aligned. Correct sheathing installation ensures a solid and stable base for the siding.
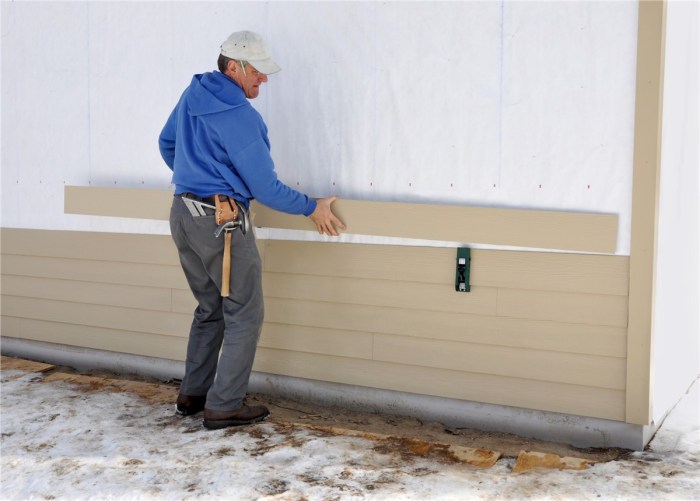
- Siding Installation: This is the main phase of the project. Starting at a corner, siding panels are installed using nails or screws, ensuring proper overlap and alignment. Each panel must be correctly spaced and secured to prevent warping or damage. The specific technique depends on the chosen siding type (lap siding, panel siding, etc.).
- Caulking and Sealing: After the siding is installed, all seams and gaps need to be properly caulked and sealed to prevent water infiltration. This step is crucial for preventing future water damage and maintaining the integrity of the siding system.
- Finishing Touches: Final steps include installing trim, finishing around windows and doors, and cleaning up the work area. This ensures a professional and polished look.
Flowchart of James Hardie Siding Installation
Imagine a flowchart starting with a rectangle labeled “Project Planning & Material Acquisition”. This leads to a diamond-shaped decision point: “Is the substrate properly prepared?”. A “Yes” path leads to a rectangle “Framing & Flashing”, which then leads to “Sheathing Installation”. A “No” path leads back to “Substrate Preparation”. “Sheathing Installation” leads to “Siding Installation”, followed by “Caulking & Sealing” and finally “Finishing Touches” and “Project Completion”.
Comparison of James Hardie Siding Installation Methods
Different installation methods exist, each with its advantages and disadvantages. The choice depends on factors like budget, project complexity, and installer expertise.
| Installation Method | Advantages | Disadvantages | Suitable for |
|---|---|---|---|
| Nail-on Installation | Cost-effective, relatively quick | Requires precise nailing to avoid damage, less durable in high-wind areas | Standard residential applications |
| Screw-on Installation | More durable, better resistance to high winds, allows for easier removal and replacement of individual panels | More expensive, slightly slower installation | Areas prone to high winds, larger projects |
| Combination (Nails & Screws) | Combines the advantages of both methods, offering increased durability and flexibility | More complex installation process, requires more expertise | Projects requiring a high level of durability and longevity |
Necessary Tools and Materials
Proper tools and materials are paramount for a successful James Hardie siding installation. Using the right equipment not only ensures a high-quality finish but also significantly improves safety and efficiency, ultimately saving you time and money. Failing to properly equip yourself can lead to delays, rework, and even injury. This section details the essential tools and materials, categorized for clarity.
Essential Tools for James Hardie Siding Installation
A comprehensive toolkit is crucial for a smooth installation. The specific tools may vary slightly depending on the project’s complexity and the chosen siding profile, but the following list represents a solid foundation for most installations. Remember, quality tools are an investment that pays off in the long run.
- Measuring Tapes: At least two, one for precise measurements and another for quick checks. A laser measure can significantly speed up the process.
- Chalk Line: Essential for marking straight lines and ensuring consistent spacing between siding panels.
- Level: A 4-foot level is ideal, ensuring vertical and horizontal alignment of the siding. A laser level can improve accuracy and speed.
- Circular Saw with Fine-Tooth Blade: For cutting James Hardie siding panels to size. A carbide-tipped blade is highly recommended for clean cuts.
- Jigsaw: Useful for cutting intricate shapes and curves, often necessary around windows and corners.
- Drill with Various Drill Bits: For pilot holes and driving screws. A cordless drill is preferred for its mobility.
- Impact Driver: For faster and more efficient screw driving, particularly useful with self-tapping screws.
- Safety Glasses and Hearing Protection: Always essential for protecting your eyes and ears from flying debris and noise.
- Putty Knife: For applying caulk and smoothing out seams.
- Hammer: Useful for various tasks, including driving nails (if applicable) and tapping tools into place.
- Utility Knife: For cutting flashing and other materials.
- Measuring Square: For precise angle cuts and ensuring square corners.
- Scaffolding or Ladder: For safe and easy access to higher areas.
James Hardie Siding Materials
Accurate material estimation is critical to avoid delays and extra costs. Underestimating material needs can disrupt the workflow, while overestimating leads to unnecessary expenses. Always factor in waste and potential errors. Consult with your supplier or use online calculators to get an accurate estimate based on your project’s square footage and chosen siding profile.
- James Hardie Siding Panels: The quantity depends on the total square footage of the project, accounting for waste and cuts. Choose the right profile and color to match your design.
- Starter Strips: These are essential for starting the installation process and ensuring a clean, even look.
- J-Channels: Used to finish the edges of the siding and provide a neat appearance around corners and windows.
- Flashing: Essential for protecting the building from water damage around windows, doors, and other openings. Different types of flashing are used depending on the situation.
- Caulk: Used to seal gaps and joints, preventing water infiltration. Choose a high-quality, exterior-grade caulk.
- Fasteners: Use only the fasteners recommended by James Hardie. Using incorrect fasteners can void warranties and compromise the structural integrity of the siding.
- Trim Boards: Used to finish the edges and corners of the siding. These are often chosen to complement the siding color and style.
Crucial Safety Equipment
Safety should be the top priority during any home improvement project. James Hardie siding installation involves working at heights and using power tools, making safety equipment non-negotiable. Ignoring safety precautions can lead to serious injuries.
- Safety Glasses: Protect your eyes from flying debris.
- Hearing Protection: Reduce exposure to loud noises from power tools.
- Work Gloves: Protect your hands from cuts and abrasions.
- Dust Mask: Reduce inhalation of dust and particles generated during cutting and installation.
- Hard Hat: Essential when working at heights to protect against falling objects.
- Safety Harness and Fall Protection System: Mandatory when working at significant heights to prevent falls.
- Proper Footwear: Wear sturdy work boots with good traction to prevent slips and falls.
Preparing the Surface for Installation

Proper surface preparation is paramount for a successful James Hardie siding installation. Neglecting this crucial step can lead to issues ranging from unsightly gaps and uneven finishes to more serious problems like moisture intrusion and premature siding failure. A meticulously prepared surface ensures a long-lasting, aesthetically pleasing result, maximizing your investment.
A well-prepared surface provides a stable and consistent base for the new siding. This prevents problems that can arise from uneven surfaces or underlying structural issues. The process involves several key steps, each contributing to the overall integrity and longevity of the installation.
Moisture Control and Ventilation
Maintaining proper moisture control and ventilation is critical for preventing rot, mold, and mildew growth behind the siding. Excessive moisture can weaken the underlying structure and compromise the integrity of the siding itself. Adequate ventilation allows for air circulation, helping to dissipate moisture and prevent the buildup of humidity. This is especially important in climates with high humidity or frequent rainfall. Inspect the existing wall sheathing for any signs of water damage, such as discoloration, soft spots, or mold growth. Repair or replace any damaged sections before proceeding with the installation. Ensure proper flashing is installed around windows and doors to prevent water from penetrating the wall assembly. Consider installing a drainage plane behind the siding to further enhance moisture management. Properly functioning soffit and fascia vents are also essential for creating a balanced airflow system.
Identifying and Addressing Structural Issues
Before beginning the siding installation, a thorough inspection of the existing wall structure is necessary. Look for any signs of damage, such as cracks, loose boards, or insect infestation. Address any structural issues promptly to prevent them from compromising the integrity of the new siding. Cracks in the sheathing should be repaired using appropriate patching materials. Loose or damaged sheathing boards must be replaced. Any evidence of insect infestation requires professional treatment to eliminate the problem before proceeding. If significant structural issues are discovered, it’s advisable to consult a structural engineer to ensure the wall is suitable for the new siding. Ignoring structural problems can lead to premature siding failure and costly repairs down the line. A structurally sound wall is the foundation for a successful siding installation.
Surface Cleaning and Preparation
Thorough cleaning of the existing wall surface is essential before siding installation. Remove any loose paint, debris, or other contaminants that could interfere with the adhesion of the siding or flashing. Power washing is often used for this purpose, ensuring that all loose materials are removed. After cleaning, allow the surface to dry completely before proceeding with the installation. Any remaining loose materials will compromise the bond between the siding and the underlying structure. For surfaces with significant imperfections, consider applying a skim coat of cement-based patching compound to create a smoother, more even surface. This will improve the overall appearance of the finished installation and ensure a consistent look.
Installation Techniques and Best Practices
Installing James Hardie siding requires precision and adherence to best practices to ensure a long-lasting, beautiful, and weather-resistant exterior. Proper techniques in cutting, fastening, and finishing are crucial for maximizing the product’s lifespan and minimizing potential issues. This section details key steps to achieve a professional-quality installation.
Mastering the installation process translates directly to a superior final product. A well-installed James Hardie siding system not only enhances curb appeal but also provides robust protection against the elements, potentially saving you money on future repairs. By following these best practices, you’ll be well on your way to a successful project.
Cutting and Fitting James Hardie Siding Panels
Precise cutting is paramount to achieving a seamless and aesthetically pleasing finish. Use a sharp carbide-tipped blade in a circular saw, ensuring the blade is properly aligned to avoid chipping or splintering. For intricate cuts, a jigsaw with a fine-tooth blade is recommended. Always pre-drill pilot holes before fastening to prevent cracking. When fitting panels, ensure proper alignment and overlap according to the manufacturer’s specifications. Accurate measurements and careful planning will prevent costly mistakes and ensure a professional outcome. Remember to use appropriate safety gear, including eye protection and hearing protection, during all cutting operations.
Fastening and Securing the Siding
Proper fastening is essential for the longevity and structural integrity of the siding. Use corrosion-resistant nails or screws specifically designed for James Hardie products. The nails should be driven straight and flush with the surface of the siding to prevent damage and ensure a clean appearance. Over-driving nails can cause cracking, while under-driving can compromise the secure hold. Spacing between fasteners should be consistent and adhere to the manufacturer’s guidelines. Consider using a nail gun for increased efficiency and consistency, but always maintain control to avoid damaging the siding. Regularly check for proper alignment and spacing throughout the installation process to prevent future problems.
Finishing and Caulking Around Windows and Doors
Proper finishing around windows and doors is crucial for preventing water infiltration. Several methods exist, each with its own advantages and disadvantages. One common approach involves using a high-quality, paintable caulk designed for exterior applications. This caulk should be applied in a neat, continuous bead, ensuring complete sealing around the window or door frame. Another method involves using pre-fabricated trim pieces designed specifically for James Hardie siding. These trim pieces provide a clean, professional look and offer added protection against water penetration. Regardless of the method chosen, careful attention to detail is crucial to ensure a weather-tight seal. A poorly sealed window or door can lead to significant damage over time, highlighting the importance of this step.
Troubleshooting Common Installation Issues
James Hardie siding, while durable and attractive, can present installation challenges. Understanding and proactively addressing common problems is crucial for ensuring a long-lasting, aesthetically pleasing finish. Ignoring these issues can lead to costly repairs and compromise the structural integrity of your siding. This section details common problems and their effective solutions.
Successfully installing James Hardie siding requires precision and attention to detail. Even experienced installers can encounter unforeseen difficulties. Knowing how to identify and rectify these problems efficiently saves time, materials, and ultimately, money.
Gaps Between Siding Panels
Gaps between siding panels are a frequent problem, often stemming from improper measurement or insufficient expansion space. These gaps not only detract from the overall appearance but also compromise weather protection. The solution involves careful re-measurement and, if necessary, the removal and reinstallation of affected panels. Remember to account for the recommended expansion gaps Artikeld in the James Hardie installation guide. In cases of minor gaps, carefully applied caulking, specifically designed for exterior use and compatible with fiber cement, can provide a temporary fix. However, for larger gaps, replacing the panels is the more reliable solution.
Misaligned Siding Panels
Misalignment can result from inconsistent nailing, uneven surface preparation, or inaccurate measurements. This issue affects the aesthetic appeal and can potentially create gaps that allow water penetration. Careful planning and precise measurements are essential preventative measures. For minor misalignments, gently adjusting the panels might suffice. For more significant issues, however, removing and reinstalling the affected panels is the best course of action. This highlights the importance of a thorough pre-installation inspection of the underlying surface to ensure its evenness.
Damage to Siding Panels
Damage during handling or installation is possible. This can range from minor scratches to significant cracks or breaks. Preventing damage requires careful handling and the use of appropriate tools. Minor scratches can often be concealed with touch-up paint, ensuring color matching. For more substantial damage, replacement of the affected panel is necessary. Always inspect panels before and after installation to identify and address any damage promptly. Using protective covering during transportation and installation will reduce the risk of damage.
Flashing and Water Penetration Issues
Proper flashing is paramount to preventing water damage. Issues arise from improper installation or inadequate flashing materials. Water penetration can lead to significant structural problems and costly repairs. Ensure that all flashing is correctly installed, overlapping appropriately and sealed with high-quality sealant. Regular inspections, especially around windows and doors, are crucial for early detection of any water penetration issues. Addressing these issues promptly prevents further damage and costly repairs. Utilizing the recommended flashing materials and techniques from James Hardie is essential.
Post-Installation Care and Maintenance
Proper care and maintenance are crucial for extending the lifespan of your James Hardie siding and preserving its aesthetic appeal. Neglecting these steps can lead to premature deterioration, costly repairs, and a diminished curb appeal. This section details the essential steps to keep your siding looking its best for years to come.
James Hardie siding, while durable, still requires regular attention. Think of it like a high-performance car – regular maintenance ensures optimal performance and longevity. A proactive approach to cleaning and minor repairs will significantly reduce the need for extensive, and expensive, work down the line. This translates to long-term cost savings and peace of mind.
Cleaning James Hardie Siding
Regular cleaning removes dirt, grime, and mildew, preventing them from damaging the siding’s surface. A simple solution of mild detergent and water, applied with a soft-bristled brush or pressure washer (using low pressure), is usually sufficient. For stubborn stains, a solution of bleach and water (always follow manufacturer’s dilution instructions) can be effective, but be sure to rinse thoroughly afterward. Avoid abrasive cleaners or harsh chemicals, as these can scratch or damage the siding’s finish. Annual cleaning is recommended, but more frequent cleaning might be necessary depending on your climate and environment.
Protecting James Hardie Siding from Damage and Weathering
Protecting your investment from the elements is key to its longevity. Regularly inspect the siding for any signs of damage, such as cracks, loose pieces, or insect infestation. Address these issues promptly to prevent further damage. Consider trimming overhanging branches that could scratch the siding during storms. For areas particularly susceptible to harsh weather, the application of a high-quality sealant can provide additional protection against moisture and UV damage. This is especially important in coastal regions or areas with extreme temperature fluctuations. Remember to always choose sealants specifically designed for fiber cement siding.
Addressing Minor Repairs and Replacements
Minor repairs, such as replacing damaged or loose pieces of siding, are often manageable with basic tools and some DIY skills. Start by carefully removing the damaged section, ensuring you don’t damage surrounding pieces. Then, install a replacement piece, following the manufacturer’s instructions. For larger repairs or if you’re uncomfortable tackling the job yourself, it’s best to contact a qualified professional. They possess the expertise and tools to ensure the repair is done correctly and efficiently, preserving the integrity of your siding system. Remember that attempting complex repairs without proper knowledge can lead to further damage and increased costs.
Cost Considerations and Budgeting
James Hardie siding offers durability and aesthetic appeal, but understanding the associated costs is crucial for a successful project. Accurate budgeting prevents unexpected expenses and ensures a smooth installation process. This section breaks down the typical cost components and factors influencing the final price.
The total cost of a James Hardie siding installation is influenced by several interconnected variables. Ignoring these factors can lead to significant budget overruns. A comprehensive understanding of these variables empowers homeowners to make informed decisions and manage their project effectively.
Material Costs
Material costs represent a significant portion of the overall budget. These costs depend on the chosen siding type (e.g., HardiePlank, HardieShingle, HardieTrim), the quantity needed, and any additional features like trim or accessories. Pricing varies based on region and supplier. For example, a standard HardiePlank installation might range from $5 to $15 per square foot, while more intricate designs with extensive trim can cost significantly more. It’s essential to obtain detailed quotes from multiple suppliers to compare prices and ensure you’re getting the best value for your investment.
Labor Costs
Labor costs are often the second largest expense. The complexity of the project, the size of the house, and the experience level of the contractor all impact labor costs. Experienced installers command higher rates, but their expertise often translates to a more efficient and higher-quality installation. Expect to pay anywhere from $3 to $10 per square foot for labor, with larger or more complex projects demanding higher costs. Obtaining multiple bids from reputable contractors allows for comparison and negotiation.
Permit Costs
Building permits are a necessary expense, though the exact cost varies widely by location and the project’s scope. It’s essential to factor in these costs upfront to avoid delays or potential legal issues. Contact your local building department to obtain information on permit fees and any required inspections. These fees can range from a few hundred to several thousand dollars depending on the size and complexity of the project and local regulations.
Sample Budget
Let’s consider a hypothetical 1,500 square foot house requiring James HardiePlank siding installation.
| Cost Category | Estimated Cost |
|---|---|
| Materials (Siding, Trim, Fasteners) | $7,500 – $22,500 |
| Labor | $4,500 – $15,000 |
| Permits | $500 – $2,000 |
| Total Estimated Cost | $12,500 – $39,500 |
Note: This is a rough estimate. Actual costs can vary significantly based on the factors discussed above. Always obtain multiple detailed quotes from reputable contractors.
Visual Guide to Installation
Proper installation of James Hardie siding is crucial not only for its longevity and performance but also for its aesthetic appeal. A professionally installed façade presents a clean, consistent, and visually stunning exterior. This visual guide will help you understand the key elements of a successful installation, enabling you to identify excellent workmanship and spot potential problems.
Understanding the visual cues of a well-installed James Hardie siding system allows for effective quality control during and after the installation process. This ensures the project meets the high standards expected of this premium product.
Seams, Fasteners, and Trim Appearance
Properly installed James Hardie siding exhibits nearly invisible seams. Panels should butt together tightly, with minimal gaps. Fasteners should be countersunk and nearly invisible, flush with the surface of the siding. Visible fastener heads indicate improper installation and potential for water damage. Trim pieces, such as corner boards, J-channels, and window/door casings, should be precisely mitered and seamlessly integrated with the siding panels. The overall impression should be one of clean lines and a professional finish. Any visible gaps or inconsistencies suggest a need for further inspection.
Visual Differences Between Siding Styles and Profiles
James Hardie offers a variety of siding styles and profiles, each with its unique visual characteristics. For example, the popular HardiePlank® lap siding offers a classic, traditional look with a subtle shadow line between each plank, creating depth and visual interest. HardieShingle® siding, on the other hand, mimics the appearance of traditional wood shingles, providing a more rustic and textured finish. HardiePanel® vertical siding presents a clean, modern aesthetic with broad, vertical panels. These different profiles cater to various architectural styles and homeowner preferences, offering a wide range of visual options to complement any home. The visual difference is immediately apparent: the textures, panel widths, and shadow lines vary significantly between these profiles.
Example of Properly Installed Siding Section
Imagine a section of a home’s exterior showcasing a flawlessly installed James HardiePlank® lap siding system. The deep, consistent shadow lines between each plank create a visually pleasing pattern. The panels are aligned perfectly, with no noticeable gaps or misalignments. At the corners, precisely mitered corner boards seamlessly transition the siding around the exterior angles. Underneath the siding, appropriately sized and positioned flashing provides critical water protection. The fasteners are neatly countersunk, almost entirely invisible against the siding’s surface. Around windows and doors, J-channels and window trim are neatly installed, creating a crisp, finished look. The overall impression is one of precision, quality, and lasting beauty. This visual representation exemplifies the professional standard expected from a properly installed James Hardie siding system, highlighting the importance of attention to detail in achieving a superior outcome.
Successfully installing James Hardie siding elevates your home’s value and curb appeal. By following the steps Artikeld in this guide, you’ll gain the confidence to tackle this project effectively. Remember, proper preparation and attention to detail are crucial for a seamless installation and long-lasting results. Don’t hesitate to consult professionals if you encounter any unforeseen challenges. With careful planning and execution, you can enjoy the beauty and durability of James Hardie siding for years to come.
Detailed FAQs
Can I install James Hardie siding myself?
While possible for experienced DIYers, James Hardie installation is labor-intensive and requires specific skills. Consider your skill level and the project’s complexity before attempting a DIY installation.
How long does James Hardie siding last?
With proper installation and maintenance, James Hardie siding can last 30-50 years or more, significantly outlasting many other siding options.
What’s the best time of year to install James Hardie siding?
Spring and fall are generally ideal, avoiding extreme heat or freezing temperatures that can affect the installation process and the siding’s performance.
How much does professional James Hardie siding installation cost?
Costs vary greatly based on factors like house size, siding type, labor rates, and regional differences. Get multiple quotes from reputable contractors for accurate pricing.
Is James Hardie siding recyclable?
While not directly recyclable in the same way as some materials, James Hardie offers a recycling program for their waste materials generated during manufacturing and installation.
